It's been an exceptionally busy week, so that's why you haven't seen very many blog posts from me. Next week will be better, and I'll be back in the kitchen. I apologize. Sometimes life just happens.
I'm going to do something now that I promise I won't do very often; I'm going to post an entry that's not a food or healthy living entry, but this is important to me, and I'll advocate for this particular issue with my dying breath. I briefly mentioned in my long "my story" post that I'm an IVF patient. This week is National Infertility Awareness Week. In order to spread awareness, and to give voice, Keiko Zoll made this amazing, wonderful, touching, and very very brave video. I'm reposting it here. It deserves to be seen by as many people as possible, and I am deeply grateful that she put her heart out there for the world to see.
What IF? A Portrait of Infertility from Keiko Zoll on Vimeo.
I now return you to your regularly scheduled food blog posts.
Thanks for taking the time to watch this video.
Friday, April 30, 2010
Tuesday, April 27, 2010
Healthy, Gluten Free Crackers
These crackers aren't so much a cracker in the thin, crispy sense. They are thicker, chewier, heartier, with a slight crisp around the edges, and they are oh so good. They're kind of a crackery/bready/cakey texture. They're wonderful for the spreading of hummus or baba ghanouj. They're fantastic as a side for soup. Rolled thicker and cut larger, they make a good flat bread for sandwiches. They're also pretty darned good just by themselves. Not that I know this from experience, because I ate half a dozen of them all by myself or anything.
This recipe is a mash up of the (never home)maker's version and the Oh She Glows version, spiced to match my preferences. Both of those blogs are amazing, and if you don't follow them, you probably should! I've learned so much from them both. Anyway, these crackers are also gluten free and vegan. Win all the way around here!
This recipe offers one last advantage. It's a way to use up leftovers. There tends to be both left over quinoa and left over rice pretty often around here. Unfortunately, today I had neither, so I actually had to cook!
Healthy, Gluten Free Crackers
Ingredients:
Directions:
1. Cook rice and quinoa in separate pots.
2. Cool completely.

3. Preheat oven to 350°.
4. Put all ingredients into bowl of food processor and process until well mixed.

5. Dump mixture onto a greased cookie sheet.
6. Flatten and shape the dough with wet hands.

7. Cover with plastic wrap and roll with rolling pin to help even out the thickness and smooth the tops. Don't worry about trying to roll it thin. These AREN'T supposed to be thin little crackers. However, if you want to work on rolling them thin, they will bake up crispier.

8. Use a pizza cutter to slice into desired shapes.

9. Bake 15 minutes, and then carefully flip the crackers over.
10. Bake 15 to 25 minutes more, until golden. Watch very carefully after 30 minutes so they won't burn.
11. Cool for 15 minutes on the baking sheet. They will further firm up while cooling.

Enjoy!
This recipe is a mash up of the (never home)maker's version and the Oh She Glows version, spiced to match my preferences. Both of those blogs are amazing, and if you don't follow them, you probably should! I've learned so much from them both. Anyway, these crackers are also gluten free and vegan. Win all the way around here!
This recipe offers one last advantage. It's a way to use up leftovers. There tends to be both left over quinoa and left over rice pretty often around here. Unfortunately, today I had neither, so I actually had to cook!
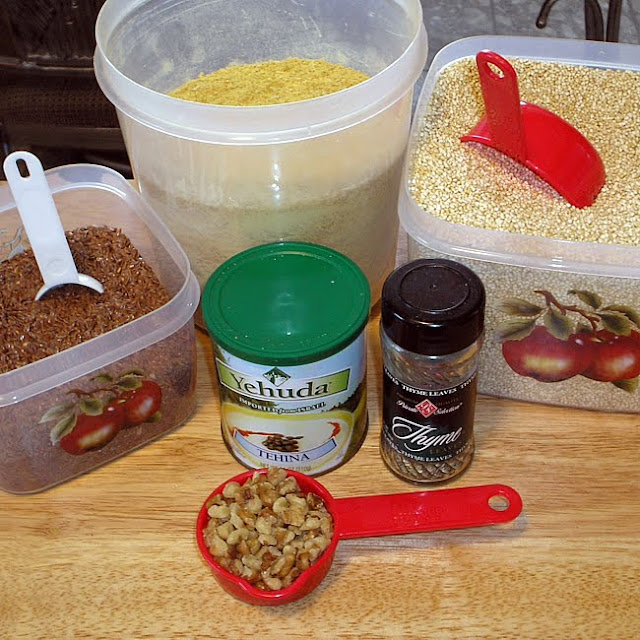
Healthy, Gluten Free Crackers
Ingredients:

- 1 cup brown rice, uncooked
- 1/2 cup quinoa, uncooked
- 1/4 cup ground flax
- 1 TBSP water
- 2 TBSP nutritional yeast
- 1 TBSP thyme
- 1 TBSP oregano
- 1/4 cup walnuts, chopped
- 1 tsp tahini
- 1 tsp sea salt
- 1 tsp garlic, finely minced
Directions:
1. Cook rice and quinoa in separate pots.
2. Cool completely.

Because I was very anxious to make these, I just dumped them both into the bowl of the food processor and shoved it in the freezer for about 15 minutes.
3. Preheat oven to 350°.
4. Put all ingredients into bowl of food processor and process until well mixed.

Don't worry when it's not dough-like. It should look like this.
5. Dump mixture onto a greased cookie sheet.
6. Flatten and shape the dough with wet hands.

7. Cover with plastic wrap and roll with rolling pin to help even out the thickness and smooth the tops. Don't worry about trying to roll it thin. These AREN'T supposed to be thin little crackers. However, if you want to work on rolling them thin, they will bake up crispier.

8. Use a pizza cutter to slice into desired shapes.

9. Bake 15 minutes, and then carefully flip the crackers over.
10. Bake 15 to 25 minutes more, until golden. Watch very carefully after 30 minutes so they won't burn.
11. Cool for 15 minutes on the baking sheet. They will further firm up while cooling.

Enjoy!
Monday, April 26, 2010
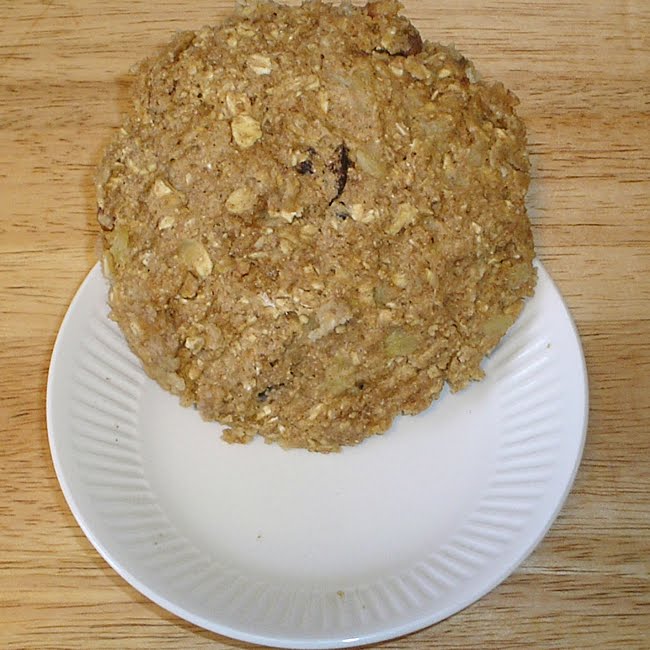
Handheld Oatmeal to Go!
Yes really. This is like the most brilliant thing ever! I got the original idea from here, and then I changed a few little things tweaked the hell out of the recipe. I've got no clue why I've never thought of this, but now that it's on my radar, there's just no looking back. I have already thought of about four dozen different variations of this recipe that I want to try.
There are days when, despite my best intentions, I just don't make it out of bed in time in order to accomplish everything I need to before I have to be somewhere. This recipe is perfect for those types of days. In just a few short minutes I can turn my beloved bowl of oatmeal into a big ol' oatmeal "cookie" and take it with me. Cookies. For breakfast. It just doesn't get much better than that!
Handheld Oatmeal to Go
Ingredients:
1. Put everything in a bowl and mix it up really well with a fork, mashing the banana pieces into the batter as you go.

2. Pat firmly into bowl with the back of a spoon.
3. Microwave on high for two minutes.
4. Let cool for about a minute before removing from bowl.


Enjoy!
There are days when, despite my best intentions, I just don't make it out of bed in time in order to accomplish everything I need to before I have to be somewhere. This recipe is perfect for those types of days. In just a few short minutes I can turn my beloved bowl of oatmeal into a big ol' oatmeal "cookie" and take it with me. Cookies. For breakfast. It just doesn't get much better than that!
Handheld Oatmeal to Go
Ingredients:
- 1/4 cup rolled oats
- 1/8 cup Egg Beaters
- Liberal dash of cinnamon
- 1/4 tsp baking powder
- Splash vanilla
- 1 TBSP dried cranberries or blueberries
- 1 TBSP chopped walnuts
- 1 TBSP natural peanut butter
- 1/2 small banana, sliced thin
- 1 TBSP raw sugar
- 2 TBSP whole wheat flour
1. Put everything in a bowl and mix it up really well with a fork, mashing the banana pieces into the batter as you go.

2. Pat firmly into bowl with the back of a spoon.
3. Microwave on high for two minutes.
4. Let cool for about a minute before removing from bowl.

Enjoy!
Friday, April 23, 2010
Potato Pancakes
Sometimes having leftovers is a good thing. I am ever mindful of waste, so I try not to have very many, but sometimes it happens, and I have to find a way to use them, because we just don't waste food in this house. Sometimes it's rather challenging to figure out how to use them up, and sometimes it's really easy. This was one of those easy times.
Leftover Potato Pancakes:
Ingredients:


Enjoy!
Leftover Potato Pancakes:
Ingredients:

- 1 cup cold mashed potatoes
- 1 TBSP ground flax seeds + 3 TBSP cold water (or one egg if you aren't vegan)
- 1 TBSP soy milk
- 2 TBSP flour (I used whole wheat)
- Seasonings to taste (Since my potatoes were already roasted garlic mashed potatoes, I used Italian seasoning and onion powder. Cajun is good. Garlic and onions powders are good. Just use what you like.)
- Grind flax seeds in coffee grinder or capable blender and mix with 3 TBSP cold water. Set aside for ten minutes to thicken.
- Mix everything else together well, add flax mixture when thick, and mix again.
- Form into three pancakes.
- Spray non-stick skillet with olive oil or cooking spray.
- Lay pancakes in skillet in a single layer and cook until each side achieves desired done-ness. I like mine to be really crispy on the outside and creamy on the inside.

Today's lunch: zucchini and tomato slices with a potato pancake and a roll left over from last night's dinner.
Enjoy!
The Best Bowl of Oatmeal Ever!
Alright so this bowl of oatmeal was a complete accident. It's something of a mash-up of Kath's overnight oats and my own tropical oatmeal, though with fresh fruit instead of dried. I was making regular overnight oats, except I used coconut milk instead of soy milk. I figured I'd have a coconutty tropical bowl this morning and just eat a banana on the side.
Two things happened. First of all, I used steel cut oats. I love them! They are way better than rolled oats--firmer, chewier, heartier. That's the problem here. They don't really make good overnight oats. They don't completely absorb the liquid and get all soft like rolled oats do. The second thing that happened was that it's cold. Yes, I know it's almost May. Don't tell me; tell Mother Nature.
Since my oats had been soaking in coconut milk and yogurt all night, I thought about scrapping them and just starting over. I had no idea how cooking them would go with all that yogurt. I am loathe to waste food, however, so I decided to give cooking them a shot. What's the worst thing that could happen, right? What resulted was the best bowl of oatmeal I've ever had!
Ingredients:

Enjoy!
Two things happened. First of all, I used steel cut oats. I love them! They are way better than rolled oats--firmer, chewier, heartier. That's the problem here. They don't really make good overnight oats. They don't completely absorb the liquid and get all soft like rolled oats do. The second thing that happened was that it's cold. Yes, I know it's almost May. Don't tell me; tell Mother Nature.
Since my oats had been soaking in coconut milk and yogurt all night, I thought about scrapping them and just starting over. I had no idea how cooking them would go with all that yogurt. I am loathe to waste food, however, so I decided to give cooking them a shot. What's the worst thing that could happen, right? What resulted was the best bowl of oatmeal I've ever had!
Ingredients:
- 1/4 cup steel cut oats
- 1/4 cup coconut milk
- 1/4 cup plain soy yogurt
- Liberal amount of cinnamon
- Dash of allspice
- 1 cup water
- 1/2 banana
- 1/2 mango
- Place oats, coconut milk, yogurt, cinnamon, and allspice in a container with a lid.
- Stir well and allow to soak overnight in the refrigerator.
- The next morning, cut up half of a banana and half of a mango into chunks.
- Place fruit in medium sized sauce pan, and cook it over medium heat. The fruit will start to get soft, melty, and caramelized.
- Add soaked oats and one cup of water to the pan and stir well.
- Let cook until it begins to softly bubble, about three minutes.
- Once it begins to bubble, cook, stirring continuously for three to five minutes more.
- Let sit for a minute before serving.

Enjoy!
Thursday, April 22, 2010
Steak-Seasoned Seitan Cutlets and How to Roast Garlic
I suppose it would be too cheesy to call these Steaktan, huh? Yeah. That's what I figured. Anyway, I make absolutely flavorless, seasonless seitan in the crock pot all of the time. I don't bother to season it, because I grind it up and use it in things with lots of flavor, like tacos and enchiladas and fried rice, or I cube it and use it in a spicy general tso's stir fry type dish. The crock pot makes a large firm roast that's good for grinding, as it's not very tender at all.
I don't often do the oven simmered cutlets. Now I remember why. Wow it's a lot of work! However, while it may indeed be labor intensive, it sure is worth the effort. These cutlets turned out tender and juicy and chewy and very flavorful. I adapted a basic recipe from The Best Cookbook in the World ™.

Seriously I love this cookbook! This is the book that actually convinced me that, while I may not like it, I can actually cook! There is SO MUCH goodness contained within these pages.

Steak-Seasoned Seitan Cutlets


6. Knead with your hands for three minutes, until the dough is elastic and fights back.
13. Remove from oven and place the cutlets in a colander to drain.
14. At this point you can use it in whatever recipe you wish, or you can store it in the refrigerator in the cooking liquid.

These freeze fantastically, as well.
Drew didn't like these. They were too chewy for him. So be warned, they are indeed chewy. If you don't like your seitan chewy, then the oven simmered cooking method is not for you. Now having said that, there are a few things to keep in mind. First of all, he's all about the texture of everything. There are things that he actually likes the taste of, but can't eat, because the "mouth feel" is all wrong. Secondly, he is an omnivore and does eat meat when not at home, and he's comparing to how meat feels. I haven't had meat in so long that I'm not even sure I remember how it feels.
The kiddo and I both enjoyed them very much--eating one and half cutlets each.

Enjoy!
I don't often do the oven simmered cutlets. Now I remember why. Wow it's a lot of work! However, while it may indeed be labor intensive, it sure is worth the effort. These cutlets turned out tender and juicy and chewy and very flavorful. I adapted a basic recipe from The Best Cookbook in the World ™.

Seriously I love this cookbook! This is the book that actually convinced me that, while I may not like it, I can actually cook! There is SO MUCH goodness contained within these pages.

Steak-Seasoned Seitan Cutlets
Ingredients:
Broth:
- 6 cups vegetable broth
- 3 TBSP steak marinade of choice (I used bourbon peppercorn)
- 1 1/4 cups vital wheat gluten
- 1/2 cup cold vegetable broth
- 1/4 cup steak marinade of choice (once again, I used bourbon peppercorn)
- 1 TBSP olive oil
- 2 cloves garlic, pressed
- 1 1/2 tsp steak seasoning (or you can make your own)
1. Preheat the oven to 350°.
2. Bring six cups broth and 3 TBSP marinade to boil in a large pot; then turn off heat and cover.
3. Place the vital wheat gluten in a mixing bowl.
4. Pour the cold vegetable broth into a measuring cup or bowl, and then add the steak marinade. Add the oil, garlic, and steak seasoning and mix well.
5. Pour the wet mixture into the vital wheat gluten and stir with a wooden spoon until most of the liquid has been absorbed.


See, it looks like brains this.
6. Knead with your hands for three minutes, until the dough is elastic and fights back.
7. Divide into six equal pieces. I sliced mine with a knife, because it's just easier that way.
8. Take each piece and stretch it and knead it into a cutlet shape, about 1/2 inch thick. This offers a lot of resistance, and it keeps snapping back into shape, so you've got to keep at it. Don't worry too much about little holes you may make in it, because the cutlets plump up and seal them.

9. Pour the heated vegetable broth/marinade into a 9 x 13 inch glass baking dish.
10. Place the cutlets in the broth.


11. Bake uncovered for 30 minutes.
12. Turn cutlets using tongs and bake for 30 minutes more.


All the tiny little holes I made while kneading it have already filled in.
13. Remove from oven and place the cutlets in a colander to drain.
14. At this point you can use it in whatever recipe you wish, or you can store it in the refrigerator in the cooking liquid.
I can't stress enough how CAREFUL you need to be while moving about a large baking dish of very hot liquid! It's not exactly the most stable thing in the world; it's pretty unwieldy, and it's HOT!
While I was cooking the cutlets, I also roasted a bulb of garlic. It's a real pain to turn on the oven and heat up the house to roast one measly bulb of garlic, but when the oven is already on, it's the perfect opportunity. Roasting garlic is a piece of cake.
All you have to do is cut the top off of the bulb, so that the tops of the cloves are exposed.
Then you lay it out on tinfoil and drizzle with olive oil.

Wrap it up really tightly and pop it into the oven. It takes about 45 minutes. Fortunately, that's just about how long we needed to cook our cutlets!
And speaking of cutlets, this is what I did with mine...
1. After the cutlets have drained, place them into a Tupperware dish with a lid.
2. Cover with the same marinade you used for the cutlet mix.

3. Let marinate for at least a couple of hours, shaking about every now and then to evenly coat cutlets, then cook in desired manner: pan fry, grill, broil, bake, etc. I put a couple of shakes of steak seasoning on top and cooked mine on the George Foreman Grill for about eight minutes.

These freeze fantastically, as well.
Drew didn't like these. They were too chewy for him. So be warned, they are indeed chewy. If you don't like your seitan chewy, then the oven simmered cooking method is not for you. Now having said that, there are a few things to keep in mind. First of all, he's all about the texture of everything. There are things that he actually likes the taste of, but can't eat, because the "mouth feel" is all wrong. Secondly, he is an omnivore and does eat meat when not at home, and he's comparing to how meat feels. I haven't had meat in so long that I'm not even sure I remember how it feels.
The kiddo and I both enjoyed them very much--eating one and half cutlets each.

Shown here with Super Fast Dinner Rolls, roasted garlic mashed potatoes, and steamed corn on the cob.
Enjoy!
Super Fast Dinner Rolls
Well, I suppose that fast is subjective here, but compared to the three hours it generally takes to produce a good yeast bread, this is fast. If you've got an hour, you can have some dinner rolls. I made these for dinner tonight. They go with my "Steak House" dinner theme. We're having grilled steak-seasoned seitan, roasted garlic mashed potatoes, corn on the cob, and dinner rolls.
Super Fast Dinner Rolls
 4. Cover with a dish towel and let rise in a warm place for 15 minutes.

9. Cover and let rise for 30 minutes.

10. If desired mist with olive oil or brush with soy milk. This step is totally optional. I misted mine with a bit of olive oil and added a few herbs to the tops of the rolls.


Enjoy!
Super Fast Dinner Rolls
Ingredients:
- 2 1/2 cups unbleached flour
- 2 TBSP vital wheat gluten (this isn't totally necessary, but it sure does help them rise up nice and fluffy and tender)
- 1 TBSP raw sugar
- 1/2 tsp salt
- 2 1/4 tsp yeast
- 3/4 cup warm water
- Substitute equal to one egg (or if you aren't vegan, use an egg or Egg Beaters) I used the ground flax method
- 2 TBSP olive oil
1. Mix one cup flour with sugar, yeast, and salt.
2. Stir in water, egg substitute, and oil
3. With electric mixer, beat until bubbly and smooth--and I mean REALLY smooth! It'll be runny.

5. Stir in remaining flour and vital wheat gluten.
6. Turn out onto a VERY WELL floured surface and knead for three minutes, until smooth and elastic. The dough is exceptionally sticky, so you need to flour the surface, and your hands, well, and as you knead incorporate some of that flour into the dough. (If you need directions on how to properly knead bread, take a look at this.)
7. Divide dough into 12 pieces and shape into rolls.
8. Arrange on a greased baking sheet for soft sided rolls or in a greased muffin tin for crusty rolls.

Yup, I know they look pretty small, but I promise they'll get much bigger. Yes, in only 30 minutes!
9. Cover and let rise for 30 minutes.

You see? They got so big, they grew together!
10. If desired mist with olive oil or brush with soy milk. This step is totally optional. I misted mine with a bit of olive oil and added a few herbs to the tops of the rolls.
11. Bake in a 450° oven for 8 to 10 minutes, until just slightly browned.


Enjoy!
Wednesday, April 21, 2010
Vegan Fried Un-Chicken
Continuing in my comfort food theme, I needed something to serve with the Creamy Crock Pot Red Potatoes, because let's face it, as yummy as they are, they aren't a meal all on their own. The Un-Chicken fit my desire for comfort very well. When I was a child, we'd travel to my grandmother's house every Sunday afternoon, and every Sunday evening for dinner we'd have fried chicken, mashed potatoes, and chicken gravy. Comforting sure, but not very good for you, and also there's that whole dead bird issue...
If, like me, you don't have vegetarian chicken bouillon powder on hand (because I can't find it around here anywhere!), then the first thing you're going to want to do is head on over to the Vegan Feast Kitchen and make up a batch of Bryanna's Chicken-Style Broth Powder. Even if you do live where you can find the packaged bullion powder, I'd suggest giving Bryanna's a try. It's far more economical, and it's GOOD!

Vegan Fried Un-Chicken
Ingredients:

Directions:
1. In a large bowl, dissolve the broth powder in the boiling water.
2. Add TVP and soak for ten minutes.

3. Add instant potato flakes, and mix well with hands. You have to get messy here. You can't mix this with a spoon. You've got to get in there with your hands, squish it through your fingers, make it into a big cohesive sticky/doughy mass.
4. Mix in salt and pepper to taste.
5. Dampen hands and form into four equal sized patties.

6. Lay crushed corn flakes on a plate.
7. Dip patties into corn flakes, pressing gently to make them stick. You may have to slightly dampen patties if the corn flakes aren't sticking well enough. I just spritzed mine with a spray bottle of water.

8. Heat a small amount of olive oil (just enough to cover the bottom of your pan) over medium heat in a large heavy frying pan.
9. Lay patties in oil in a single layer.

10. Fry patties until crispy, turning several times. Turn very carefully, as they are slightly fragile. I found it helpful to use two spatulas--one to put under the patty and one to help nudge it over.

These can be made into smaller nugget shapes for dipping. You can also bake them in a 350° oven for 15 minutes per side. Just be sure to mist both sides with olive oil before putting them into the oven! I use my handy dandy Misto for this.
These are really just a base, and there's a lot you could do with them. You could add Italian seasonings to the patty mix and use them for chicken Parmesan. You could add a splash of soy sauce to the patties and cook in sesame oil, then serve over Asian type noodles. You could fry smaller sized nuggets, coated with sesame seeds for sesame chicken. You can try different breading: crushed crackers, crushed croûtons, seasoned bread crumbs. Experiment and have fun!
I believe I've mentioned that I really don't enjoy cooking, so I'm always hesitant to try something new. It makes me angsty to put effort into doing something I don't especially enjoy and then have no one like the result. This wasn't one of those instances. Even Drew liked these and proclaimed that I can make them any time! Next time I'm definitely going to bake them, and I think I'll try tossing a bit of egg replacer into the mix to help them stick together a bit better.

Enjoy!
If, like me, you don't have vegetarian chicken bouillon powder on hand (because I can't find it around here anywhere!), then the first thing you're going to want to do is head on over to the Vegan Feast Kitchen and make up a batch of Bryanna's Chicken-Style Broth Powder. Even if you do live where you can find the packaged bullion powder, I'd suggest giving Bryanna's a try. It's far more economical, and it's GOOD!

Vegan Fried Un-Chicken
Ingredients:
- 1 cup TVP
- 1 cup boiling water
- 2 TBSP vegetarian chicken bouillon powder
- 1 cup instant mashed potatoes, dry
- 1 1/3 cups finely crushed corn flakes. You can crush your cereal in your favorite cereal crushing method. A food processor or blender both work well. However, I crushed mine in a plastic bag with a plain Jane rolling pin. Less dishes that way.

Directions:
1. In a large bowl, dissolve the broth powder in the boiling water.
2. Add TVP and soak for ten minutes.

3. Add instant potato flakes, and mix well with hands. You have to get messy here. You can't mix this with a spoon. You've got to get in there with your hands, squish it through your fingers, make it into a big cohesive sticky/doughy mass.
4. Mix in salt and pepper to taste.
5. Dampen hands and form into four equal sized patties.

6. Lay crushed corn flakes on a plate.
7. Dip patties into corn flakes, pressing gently to make them stick. You may have to slightly dampen patties if the corn flakes aren't sticking well enough. I just spritzed mine with a spray bottle of water.

8. Heat a small amount of olive oil (just enough to cover the bottom of your pan) over medium heat in a large heavy frying pan.
9. Lay patties in oil in a single layer.

10. Fry patties until crispy, turning several times. Turn very carefully, as they are slightly fragile. I found it helpful to use two spatulas--one to put under the patty and one to help nudge it over.

These can be made into smaller nugget shapes for dipping. You can also bake them in a 350° oven for 15 minutes per side. Just be sure to mist both sides with olive oil before putting them into the oven! I use my handy dandy Misto for this.
These are really just a base, and there's a lot you could do with them. You could add Italian seasonings to the patty mix and use them for chicken Parmesan. You could add a splash of soy sauce to the patties and cook in sesame oil, then serve over Asian type noodles. You could fry smaller sized nuggets, coated with sesame seeds for sesame chicken. You can try different breading: crushed crackers, crushed croûtons, seasoned bread crumbs. Experiment and have fun!
I believe I've mentioned that I really don't enjoy cooking, so I'm always hesitant to try something new. It makes me angsty to put effort into doing something I don't especially enjoy and then have no one like the result. This wasn't one of those instances. Even Drew liked these and proclaimed that I can make them any time! Next time I'm definitely going to bake them, and I think I'll try tossing a bit of egg replacer into the mix to help them stick together a bit better.

Enjoy!
Creamy Crock Pot Red Potatoes
Sometimes comfort food really is in order. I try to make my comfort food as healthy as possible, and sometimes I have to compromise. For instance, this recipe isn't necessarily healthy, but it's not really bad for you either, as it has some extremely healthy elements. I've cleaned it up a lot by using low fat and fat free versions of several ingredients. The good news is that these potatoes are so rich and so creamy that just a few of them make a satisfying side dish. And the potato part is GOOD for you!
Creamy Crock Pot Red Potatoes
Ingredients:

These are for dinner tonight. I'm going to serve them with Vegan Fried Un-Chicken and fresh corn on the cob. Check back later for the Un-Chicken recipe and pictures of the finished meal.
Potatoes have about 620 mg of potassium-that's more than a banana. Potassium is essential to the body because of its role in attaining optimal muscle performance and improving the nerves' response to stimulation. Iron, essential in helping the body convert food to energy as well as resist infection, is also present.There's a bunch more nutrition information about the potato over here, if you'd like to read it.
One would expect potatoes to have minerals, as they spend their life underground. But potatoes are also a great source of vitamins, even supplying vitamin C, which is essential to help maintain healthy connective tissue and heal wounds. The many varieties of potatoes are also good sources of B vitamins, helping the body make healthy red blood cells and amino acids.Potatoes contain no fat or cholesterol and minimal sodium. What they do have is natural fiber in the skins, all those vitamins and minerals and great flavor. And a six-ounce potato contains 2 grams of highly digestible protein, almost as much as half a glass of milk, making it a great foundation for a whole meal.
Creamy Crock Pot Red Potatoes
Ingredients:
- 2 pounds small red potatoes, cut into eighths--cut potato in half, then quarter the halves
- 2 (8 ounce) packages fat free cream cheese, softened for one minute in microwave
- 1 can low fat cream of potato soup, undiluted
- 1 envelope ranch salad dressing mix
- 1/4 cup milk of choice (soy, rice, cow, almond, etc.)
- Place potato pieces in crockpot.
- In a large bowl, with an electric mixer on high, beat together cream cheese, soup, salad dressing mix, and milk.
- Stir into potatoes.
- Cover and cook on low for 8 hours or until potatoes are tender.

These are for dinner tonight. I'm going to serve them with Vegan Fried Un-Chicken and fresh corn on the cob. Check back later for the Un-Chicken recipe and pictures of the finished meal.
Banana Nut Bread Oatmeal
It's like having dessert. For breakfast! This bowl of oats was once again inspired by kath, who is the reigning queen of oatmeal. I used her whipped banana oatmeal recipe and added some toppings, and suddenly I had banana bread in a bowl. I felt guilty for eating it for breakfast, because it tasted like it should have been forbidden.
Banana Nut Bread Oatmeal
Ingredients:

Enjoy!
Banana Nut Bread Oatmeal
Ingredients:
- 1/4 cup rolled oats
- 1/4 cup water
- 1/3 cup unsweetened soy milk
- 1/2 large banana (I LOVE banana!) cut into chunks
- Scant pinch sea salt
- 1/2 tsp pure vanilla
- 3 TBSP chopped walnuts
- Healthy sprinkle cinnamon
- Few banana slices
- Preheat oven to 350° and toast walnuts while you're preparing your oats.
- Put oats, salt, water, soy milk, and banana into medium sauce pan and bring to boil over medium heat.
- Once oats are boiling nicely, begin to stir continuously to melt the banana into the oatmeal.
- When most of the liquid is absorbed and the banana chunks are melted, stir in vanilla, and turn off heat.
- Top with hot roasted walnuts and a liberal sprinkle of cinnamon.

Enjoy!
Tuesday, April 20, 2010
Laura's Healthy No-Bake Breakfast Energy Bars
Whew. That's a long name. I didn't think it would be kosher to just call them Laura Bars, though, because that's kinda taken, even if they do spell it wrong! Anyway, my mother recently sent some Rice Krispy Treats, and I was immediately reminded that they were my favorite childhood treat. I never wanted a birthday cake; I wanted Rice Krispy Treats. I'm much wiser now, and I realize that they are nutritionally devoid of ... well, everything. There's not a single redeeming quality in a Rice Krispy Treat. Not one.
This got my mind whirring. Surely I could make some sort of comparable treat that was much much better for me. What I ended up with didn't resemble the original inspiration in the least. In fact, the only thing in common ended up being cereal, and it wasn't even the same cereal. However, my bar is full of healthy yummy things, and it makes a great breakfast on the go or pre-gym snack. Now all it needs is a shorter name!
Laura's Healthy No-Bake Breakfast Energy Bars
Ingredients:
1. Mix the cereal, fruit, nuts, cinnamon, wheat germ, and ground flax in a large bowl.


4. Stir very well, making sure all of the cereal mixture is coated.

5. Press cereal firmly into a 9 x 13 glass baking dish. I tried using a spatula, but it just didn't work. I ended up getting my hands wet and pressing it into the dish with my hands.


6. Stick in freezer for 30 minutes, and then cut into 15 bars. Store refrigerated.

Enjoy!
This got my mind whirring. Surely I could make some sort of comparable treat that was much much better for me. What I ended up with didn't resemble the original inspiration in the least. In fact, the only thing in common ended up being cereal, and it wasn't even the same cereal. However, my bar is full of healthy yummy things, and it makes a great breakfast on the go or pre-gym snack. Now all it needs is a shorter name!
Laura's Healthy No-Bake Breakfast Energy Bars
Ingredients:
- 7 cups puffed whole wheat cereal. This does not have to be an expensive endeavor. I used the super cheap store brand in a bag. It cost me 98¢, had no added salt or sugar, and it had no preservatives. Win!
- 1 cup dried fruit. I used bananas, apples, and blueberries simply because that's what was hot off the dehydrator this week. Use any combination you'd like.
- 1/2 cup nuts. I used a mix.
- 2 TBSP ground flax seeds
- 2 TBSP wheat germ
- 1 tsp ground cinnamon
- 3/4 cup honey
- 1 cup almond butter. I made my own from raw almonds. I suppose you could roast them first if you wanted. I suppose you could even buy the kind in the jar; though you know I don't recommend that!
- 3 TBSP unsweetened apple sauce
1. Mix the cereal, fruit, nuts, cinnamon, wheat germ, and ground flax in a large bowl.

2. Put the honey, almond butter, and apple sauce into a microwave safe bowl, and heat for a minute and a half.
3. Mix very well, until almond butter is melted and incorporated and pour over cereal/fruit mixture.

4. Stir very well, making sure all of the cereal mixture is coated.

5. Press cereal firmly into a 9 x 13 glass baking dish. I tried using a spatula, but it just didn't work. I ended up getting my hands wet and pressing it into the dish with my hands.


6. Stick in freezer for 30 minutes, and then cut into 15 bars. Store refrigerated.

Enjoy!
How to Roast Vegetables
It's another how to tutorial. Aren't you guys excited? I know I am, but that's because I get to eat the fruits of my labor here. Roasting vegetables brings out a natural mild sweetness, and it's so easy. This is one of my favorite ways to prepare my veggies.
Someone asked me specifically about roasting eggplant, so keep reading, because I have eggplant specific tips interspersed throughout. I'll bold those, so they stand out!
First you want to pick out the vegetables you want to roast. You can roast pretty much any vegetable really, but root veggies work exceptionally well, as do Brussels sprouts, asparagus, squashes, and eggplants.


Put all of your vegetables in a bowl and drizzle with olive oil. A couple of tablespoons should do. Less is more!
When you are roasting just eggplant, you need to be especially mindful of the oil. Eggplant absorbs liquids very rapidly. The more oil you add, the more it will soak up. If you use too much oil, you aren't going to end up with roasted eggplant, but with a big soggy oily mass of a sponge like vegetable. Just barely coat it.
Season to taste. In this case I just used sea salt and freshly ground pepper. Sometimes I use dried Italian seasoning, and from time to time I use fresh herbs. It all just depends on what you like.
Gently stir the vegetables until all of the pieces are evenly coasted with olive oil and seasonings.

Spray the bottom of a roasting pan with olive oil or non-stick cooking spray, and add the vegetables to the pan. Make sure they are in a single layer, with some space around each veggie piece. If you put too much in the pan, the vegetables will STEAM, not roast. There's nothing wrong with steamed vegetables, but that's not what we're doing here, so leave room!

Put the vegetables on the middle rack of your preheated oven and set the timer for ten minutes. Remove them from the oven and stir/flip them. Make sure you lay them out in a single layer again, and put them back for ten more minutes. Remove and stir one last time. Return to oven for final ten minutes.
It generally takes about 30 minutes, sometimes a bit more, depending on how you like them and on how large you've cut the pieces. Again, if you are doing just eggplant, it will probably take longer, due to the high moisture content of the vegetable. They should be done in about 40 minutes.
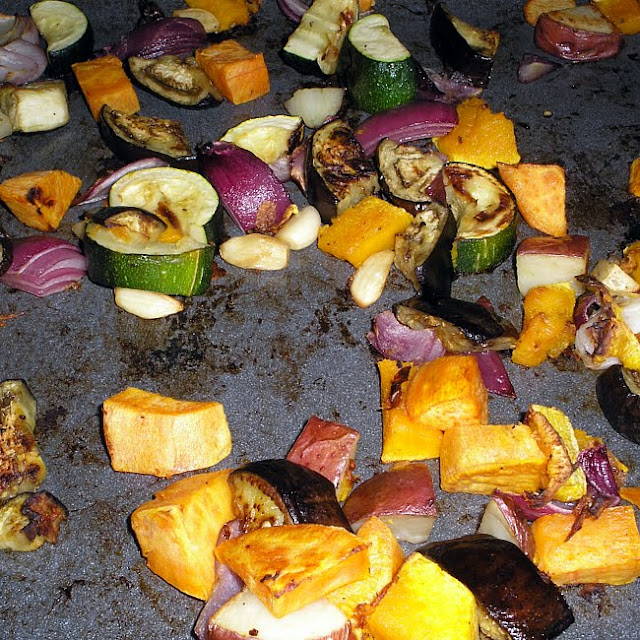
They're done when they're browned around the edges and nicely caramelized on the tops.
Enjoy!
Someone asked me specifically about roasting eggplant, so keep reading, because I have eggplant specific tips interspersed throughout. I'll bold those, so they stand out!
First you want to pick out the vegetables you want to roast. You can roast pretty much any vegetable really, but root veggies work exceptionally well, as do Brussels sprouts, asparagus, squashes, and eggplants.

My vegetables of choice for today's tutorial are a red potato, a sweet potato, a red onion, a zucchini, a butternut squash, an eggplant, and an entire bulb of garlic. I've mentioned that there's no such thing as too much garlic, right?!
Next you should preheat your oven to 400°. Do NOT put the vegetables in a cold oven; it MUST be hot!
Now you'll need to prepare the vegetables. Wash them all; yes, even the ones you are going to peel! Peel the ones you wish. In this case, I peeled the sweet potato, but I left the skin on the red potato. I peeled the skin from the onion and the garlic, and I peeled the butternut squash.
There's no need to peel the eggplant. Just cut off the top. When choosing eggplant for roasting, I've found the smaller ones are better. They are less bitter and more firm. You also want to use them within a day or two of buying them, as they tend to break down rather quickly, becoming spongy.
Once the vegetables have been washed and peeled, cut them into uniform sized pieces. Uniformity is important here so that they'll cook more or less evenly.
If you are only roasting eggplant, after you have it cut up, place the pieces in a colander and lightly salt. Let them sit for about half of an hour. This further reduces any bitterness, and it also reduces the moisture content of the eggplant.

Put all of your vegetables in a bowl and drizzle with olive oil. A couple of tablespoons should do. Less is more!
When you are roasting just eggplant, you need to be especially mindful of the oil. Eggplant absorbs liquids very rapidly. The more oil you add, the more it will soak up. If you use too much oil, you aren't going to end up with roasted eggplant, but with a big soggy oily mass of a sponge like vegetable. Just barely coat it.
Season to taste. In this case I just used sea salt and freshly ground pepper. Sometimes I use dried Italian seasoning, and from time to time I use fresh herbs. It all just depends on what you like.
Gently stir the vegetables until all of the pieces are evenly coasted with olive oil and seasonings.

Spray the bottom of a roasting pan with olive oil or non-stick cooking spray, and add the vegetables to the pan. Make sure they are in a single layer, with some space around each veggie piece. If you put too much in the pan, the vegetables will STEAM, not roast. There's nothing wrong with steamed vegetables, but that's not what we're doing here, so leave room!

Put the vegetables on the middle rack of your preheated oven and set the timer for ten minutes. Remove them from the oven and stir/flip them. Make sure you lay them out in a single layer again, and put them back for ten more minutes. Remove and stir one last time. Return to oven for final ten minutes.
It generally takes about 30 minutes, sometimes a bit more, depending on how you like them and on how large you've cut the pieces. Again, if you are doing just eggplant, it will probably take longer, due to the high moisture content of the vegetable. They should be done in about 40 minutes.
They're done when they're browned around the edges and nicely caramelized on the tops.

Enjoy!
Subscribe to:
Posts (Atom)