Monday, December 13, 2010

Pumpkin Oat Pancakes

Oh my goodness it's a recipe!  It's super simple, super yummy, and everything I needed was either out on the counter or on the top shelf of the cabinet or fridge.  I didn't have to bend or lift a thing, so this recipe fulfills both my requirements and those of my doctor.  It's win/win here!

Now, this recipe isn't vegan, but it would be super easy to veganize by making flax eggs.  This is what I would have usually done, but my little personal blender with the grinding blade has bitten the dust (I'm very sad about this!), and since I've been pregnant, the desire for eggs has been astronomical.  I NEVER just eat eggs under normal circumstances, but I've eaten my fair share over the last several months.  I fully plan to go back to being egg free after the baby is born.

This recipe came about, because I had a wicked craving for pancakes, but I've also never really liked plain ol' pancakes.  I'm not a huge fan of things made with refined white flour in the first place, and I'm very very picky about my pancakes anyway.  I need them to TASTE like something!  I went on an internet search to find some inspiration, and I discovered a lot of gluten free folks using oats as a flour substitute.  What a fantastic idea.  Oats are so healthy!  I decided to give it a try and a twist or twelve of my own, because you know I've got to get rid of as much added fat and as many animal products as I possibly can, and I'm surely glad I did.  These were fantastic!


Pumpkin Oat Pancakes

Ingredients:
  • 2 cups traditional oatmeal (not the quick cook or instant variety)
  • 2 cups almond/soy/rice/whatever milk of your choice
  • ½ cup canned pumpkin (or fresh pumpkin puree-also see further notes below)
  • 2 large organic eggs (I used ½ cup of Egg Beaters--much healthier.  You could also use egg replacer or the aforementioned flax eggs.)
  • ½ tsp sea salt
  • 1 tsp baking powder
Directions:

1.  Grind oats into flour using food processor.  As you can see, I used a blender, but that's only because the food processor weighs a bazillion pounds and was in a bottom cabinet.  The blender was on the counter, so it required no bending and lifting.  I totally recommend doing this in the food processor.  It's faster, easier, far less messy, and a breeze to clean up.


2.  Pour milk into oat flour and mix very well using a fork or wire whisk.  You'll have to pay attention here, because you need to get all of the lumps out.  It will be VERY thin.  In fact, you'll think, "I'll never be able to make batter out of this!" but trust me, you will.


4.  Soak oats in milk, storing in fridge overnight.  You need to soak at least 12 hours, and you can soak for up to 24 hours.

5.  Next morning, mix all other ingredients into the soaked oats.  Mix well.

6.  Heat griddle or large skillet over medium heat and lightly spray with olive oil.

7.  Pour about a ¼ of a cup of batter onto the skillet and cook two to three minutes, until edges start to dry and brown and bubbles form and pop on top.


8.  Flip with spatula and cook until bottom is golden brown, two to three minutes more.


Enjoy!

Notes:  If for some reason you don't want to use pumpkin, there are lots of substitutes.  You could use ½ cup of apple sauce, ½, cup of well mashed banana, ½ cup of plain soy yogurt (or dairy yogurt if you aren't trying to veganize), 4 T oil, or even 4 T of melted butter.

This recipe made a bakers dozen.

Friday, September 3, 2010

The Confession

I can finally come about the reason I've not been around for so darned long -- I'm pregnant!  I had some complications in the first trimester, which have now thankfully resolved.  That lead to lots and lots of bed rest and then lots and lots of taking it easy.

I've been cleared to have a bit more freedom now that things are going well, but there still won't be much cooking.  There's no lifting of anything heavier than my purse, so that leaves out the food processor, the blender, the dutch oven, and a myriad of other things used to create fantastic meals.  There's also no bending, and that makes it hard to cook, as well.

Now, I'm not complaining here.  I'm absolutely thrilled.  I've never been so happy about anything.  I love this blog though, and I promise that someday I'll be back.  Someday not all that far away even.  Let's say sometime in March!  So stick around, and I'll be back with renewed fervor and lots of yummy vegetarian eats!  (And just for the record, I fully plan on raising a vegetarian baby!)

Monday, August 16, 2010

No, I Haven't Forgotten You!

Hello lovelies! It's been such a long time, I know. I haven't, however, forgotten you or my blog, and I haven't abandoned you either. I've had some medical issues that have kept me out of the kitchen for a few weeks. They are resolving now though, and I hope to be back in the kitchen soon, creating yummy vegetarian dishes for all of us to try!


Stick around for a bit and bear with me here, because I'll be back soon enough.

Sunday, June 20, 2010

Shepard's Pie

This is more of a guideline type of thing than it is an official recipe.  You can use lots of different stuff for your filling.  I'm using ground seitan here, because Drew likes his to be "meaty" and also he's not terribly fond of vegetables.  There are several different things you could use to emulate meat if you so wish--steamed and ground tempeh, tvp, and of course ground seitan.  This is also REALLY good with just a vegetable base--lentils and onions, diced zucchini and yellow squash, the traditional mix of peas, carrots, and potatoes, etc. etc.  If you like it, you can put it in your Shepard's Pie; my personal favorite is lentils, onions, and zucchini.

This version is actually my "cheater's version", meaning that instead of actually making gravy, I used a can of soup.  You can use cream of anything soup (I used potato, because that's what I had).  That makes this particular recipe not vegan, but if you make your own gravy, it's quite easy to veganize.  I do that most of the time anyway, but I was in a real hurry when I made this.  We needed something hot, healthy, filling, and we needed it relatively quickly.

Shepard's Pie

Ingredients:
  • 2 cups ground seitan
  • 4 russet potatoes, peeled and chopped into uniform pieces (I only tell you this, because my husband and I once had a huge fight over whether or not to peel and chop the potatoes before boiling them.  He insisted that since the recipe didn't specifically state that the potatoes needed to be peeled and chopped before they were boiled, then he was supposed to boil them whole, peels on.  I tried to tell him that it was pretty much common sense that you peel and chop potatoes before boiling them unless you want to be boiling potatoes for three hours; he continued to insist that if he was supposed to peel and chop, then the recipe would have said peel and chop.  The stupidity of that fight made me see that either it's not so much common sense to everyone, or common sense is not so common!  Draw your own conclusions here.)
  • 2 TBSP butter or margarine of choice
  • 1/2 cup milk of choice (I used soy.)
  • 1 can cream of something soup plus 1/3 can water
  • 1/2 onion, diced
  • 2-3 cloves garlic, minced
  • 2 TBSP Worcestershire sauce
  • Salt and pepper to taste
Directions:

1.  Boil potatoes until fork tender, about 20 minutes.


2.  Spray non-stick skillet with olive oil, and brown onion and garlic over medium heat.


 3.  Add seitan (or whatever you're using as the filling) and 2 TBSP Worcestershire sauce.


4.  Cook until everything is well coated with the sauce, about five minutes.

5.  Add cream of whatever soup and 1/3 can of water, stirring until everything is mixed well and heated through, about five minutes more, remove from heat.

6.  Salt and pepper to taste.

7.  Mash potatoes with the butter and milk.


8.  Pour seitan/soup (or gravy) mixture into a sprayed 9 x 9 pan.

9.  Spread mashed potatoes over top of the mixture, pushing to edges of pan.


10.  Cover and bake 30 minutes in a 350° oven.

11.  Remove foil and broil for two to four minutes, until potatoes are browned but not burned.


Enjoy!

Tuesday, June 15, 2010

Low and Slow Baked Yams

I've mentioned before how much I love sweet potatoes, ¿no?  They ever remain one of my favorite foods, but despite that fact, I'd never tried a yam until recently.  What could possibly be the difference (aside from 12¢ a pound), right?  However, our local Hispanic market had a bumper crop, so I finally gave in and tried them a couple of weeks ago, out of nothing more than sheer curiosity.  Oh my yyuummm am I ever glad I did! 

Only after tasting the yam did I do any research at all, and I was surprised to learn that they aren't even distantly related to the sweet potato.  I feel like a real traitor saying this, but I like them so much better than sweet potatoes.  They are sweeter and creamier and moister and just so much better.  You have to be careful though to get an actual real yam.  Many many places in the U.S. label their sweet potatoes as yams, and that's just not so.  You're more likely to find an actual yam in a Hispanic or other ethnic type market, as they are generally imported from the Caribbean.

Earlier this year Kath posted about the Low and Slow method of baking sweet potatoes, and I've been making mine in that method whenever possible since then.  They are just amazing.  They are chewy and almost crispy on the outside and so soft and gooey inside, and it really brings out the natural sweetness.  This recipe is my take on the low and slow method of baking.

Low and Slow Baked Yams

Ingredients:
  • Large yam
  • Olive Oil
  • Sea salt
  • Freshly ground black pepper
  • Ground turmeric
Directions:

1.  Preheat oven to 350°

2.  Scrub yam and cut into thick rounds.


3.  Spray both sides with olive oil and sprinkle with sea salt, freshly ground black pepper, and turmeric.


4.  Place on greased baking sheet and bake for 30 minutes.

5.  Turn oven temperature up to 400° and bake for 20 minutes longer.

I topped mine with a scant drizzle of maple syrup.

Enjoy!

And just for fun, a couple of shots of my brand new kitchen.  It's so tiny that you can't actually stand in the kitchen and take a picture.  Despite it's smallness, it's WORLDS better than the one I was in before.  I loathed that kitchen with a passion!  This one, while small, is set up so much better.  Drew and I bought a great big island, and that helped a lot, giving me both counter space and much needed storage, and the fact that there's a dishwasher scores some huge points with me!


Saturday, June 12, 2010

MIA

Wow.  I've been gone for a long time.  I apologize for the absence if anyone out there is even still reading.  I mentioned before that we were moving, but it happened so fast.  Once things started to move, they REALLY started to move--faster than we thought it was going to happen.

So here we are, in a new house, with a new kitchen where I can create many tasty things, but not quite yet.  We aren't completely settled and unpacked yet, so you're gonna have to give me a few more days.  I promise something yummy when things finally stop spinning.

Thursday, May 27, 2010

Banana Balls

I love bananas so much.  In fact, I probably eat enough bananas to better qualify as Gorilla Beringei than Homo Sapien.  Draw your own conclusions! ;)  Seriously though, I found THIS recipe last night, and I just knew I had to try it out. 

What's better than a fresh, ripe banana right?  Well maybe some creamy home made peanut butter.  Or maybe oats!  Oh how I love oats.  The beauty of this recipe is that you don't have to pick between these three wonderful things.  You get to combine them all into a healthy, super yummy snack full of fiber and potassium and folic acid.  It's perfect, bite sized, raw snack.

Sadly I don't have any pictures.  I don't tend to step by step document unless the recipe is actually mine, or at least adapted.  These didn't need any adapting whatsoever though, and the real truth of the matter is that I didn't get much of a chance to take pictures, because by the time I thought that I should maybe snap a picture or two, they were gone!

I see this snack often in my future.  I also see a lot of different variations.  I already have some ideas rolling around in my head.  Expect to see some recipes soon!  In the meantime, head on over and check out this amazing little snack!

Friday, May 21, 2010

Super Chunky Vegetable Sauce

I was looking around for something to have for lunch, and I was coming up blank.  One of the disadvantages to the "use it all up before we move" school of thought is that you end up with a lot of strange odds and ends that don't necessarily go together.  We've actually got quite a lot of food in the house; it's just that it's so diverse it's hard to combine it into a meal that makes sense.

I had a few fresh veggies, a few canned veggies and lots of bulk grains and pastas.  From that, this colorful, chunky oh so flavorful sauce was born.  It turned out pretty darned good for pure improvisation.

Super Chunky Vegetable Sauce

Ingredients:
  • 3 large cloves garlic, minced
  • 1/8 cup onion, diced
  • 1/2 large zucchini, quartered and sliced very thin
  • 5 artichoke hearts from jar of marinated artichoke hearts, diced
  • 1 can diced peeled tomatoes with juice
  • Splash of liquid from jar of artichoke hearts
  • Liberal shake of dried Italian seasoning
  • Kosher salt to taste
  • Fresh ground black pepper to taste
Directions:

1.  Spray large non-stick skillet with olive oil and heat over medium heat.

2.  Add diced onions and sauté until translucent.

3.  Add minced garlic and sauté one minute.

4.  Add sliced zucchini and continue to sauté for a minute or two more.

5.  Add diced artichoke hearts and can of diced tomatoes with the juice.

6.  Add a splash of liquid from the jar of artichoke hearts.

7.  Add a liberal shake of dried Italian seasoning, salt and pepper to taste.  Stir well.


8.  Reduce heat to low and simmer sauce for eight to ten minutes, until zucchini is tender/crisp.

9.  Serve over hot cooked pasta or grains of choice.  I ate mine over Israeli couscous, but I imagine it would be great over quinoa or bulgur as well.


Enjoy!

Vegan Italian Garlic Focaccia Bread

Tonight we're having a simple dinner of lasagna and a vegetable.  I made the lasagna a couple of months ago when I was stocking the freezer, and now it's time to eat it (once again with trying to use up the food we have before we move, so we don't have to attempt to move food!).  I always like to serve a nice home made bread with such a simple dinner, because it really dresses things up a bit and makes dinner a tad more interesting.

This is a pretty easy recipe, as far as bread recipes go.  It takes a bit of time, but most of that time is spent doing other stuff (packing, anyone?) while the bread rises.  This isn't quite as easy as the Super Fast Dinner Roll recipe, but it's pretty darned close.

Italian Garlic Focaccia

Ingredients:


For the bread:
  • 1 1/4 cups warm water
  • 1 TBSP raw cane sugar
  • 2 1/4 tsp active dry yeast
  • 1 tsp kosher salt
  • 3 cups unbleached all purpose flour
  • 3 TBSP vital wheat gluten
  • 1 TBSP olive oil
For the top:
  • 2 TBSP olive oil
  • 2 TBSP vegan Parmesan
  • 2 large cloves garlic, finely minced or pressed
  • 2 tsp dried Italian seasoning
Directions:

1.  Combine yeast, warm water, and sugar in a large bowl.  Cover with clean dish towel and let sit for ten minutes.

2.  Add salt, flour, vital wheat gluten, and olive oil (1 TBSP).  Mix until everything is well incorporated.  Dough will be sticky.

3.  Turn out onto well floured surface and knead until smooth and shiny, about five minutes.

4.  Shape dough into ball and place into a lightly oiled bowl.  Cover and let rise until double in size, about one hour.

5.  Punch down dough and divide in half.  Form each half into a ball, and place on a baking sheet that has been sprayed and lightly dusted with cornmeal.

6.  Roll each ball into an eight inch circle.

7.  Press fingertips into the dough to make indentions.


8.  Cover dough and let rise until double in size, about 20 minutes.

9.  Drizzle each loaf with 1 TBSP olive oil (I used my handy Misto oil sprayer; it makes things so much easier!).  Sprinkle 1 TBSP vegan Parmesan, 1 TBSP minced garlic, and 1 tsp Italian seasoning on top of each loaf.


10.  Bake at 375° for 20 minutes, until puffed and golden brown.


Enjoy!

Thursday, May 20, 2010

Savory Oats

This started out as a bit of experiment, inspired by a craving for grits I had last night.  I love grits, but I haven't had them in years, so needless to say, there were none in the house.  I started wondering if I could make oatmeal into a savory dish, like grits.  I broke out my Google-fu to see what Dr. Internet had to say about the subject, and I found a lot of people who like savory oats, but I didn't find any real recipes--just lots of statements like "Oh I love my oats with soy sauce" and "I make mine with green onions and cheese."

This morning I decided to try my hand at savory oats, catered to my own tastes.  I'm a HUGE fan of everything savory.  You've probably noticed that I don't really add any extra sweeteners to my recipes; the fruit or milk tends to have enough sweetness for me.  I've never had much of a sweet tooth, but I can put away the salty and/or savory dishes!

I made mine with water, but I would have used milk had I had any milk that doesn't have very distinctive flavors.  All I had on hand was coconut and vanilla soy.  We're moving at the end of the month, and I'm actually trying to stretch the food until then, so we don't have to try and move very much food.  But I digress...  Use whatever type of oats you would like, but follow the cooking directions on the package as to oat/liquid ratio and cook time.  Please excuse the wonky pictures.  It's cloudy outside today, so the natural light  wasn't so good.

Savory Oatmeal

Ingredients:

  • 1/4 cup Steel Cut Oats
  • 3/4 cup water or milk of choice
  • 2 eggs, lightly beaten with a pinch of salt (I used Egg Beaters)
  • 2 TBSP shredded cheese
  • 1 large clove garlic, minced
  • 1/8 cup onion, diced
Directions:

1.  Lightly spray medium sauce pan with olive oil and sauté onions and garlic, over medium heat, until just translucent.  You need to stir constantly so the garlic won't burn.


2.  Add the water or milk and the oats, turn heat to high, and bring to a boil, stirring constantly.

3.  Once boil is achieved, turn down the heat to low and simmer for five minutes, stirring occasionally.

4.  Temper the egg by adding a spoonful of the hot oatmeal to the beaten eggs and stirring thoroughly.  Now do this again with a second spoonful of oatmeal into the eggs.  This brings the eggs to the temperature of the oats, ensuring that there won't be any big pieces of egg in your finished product.


 5.  Slowly add the eggs back into the sauce pan with the oatmeal, stirring well to incorporate.


 6.  Return heat to medium and cook, stirring constantly, until eggs are cooked through, about four minutes.

7.  Stir in half of shredded cheese.

8.  Top with a few grinds of fresh black pepper and the remaining tablespoon of shredded cheese.


Enjoy!

Tuesday, May 18, 2010

How to Make Your Own Nut Butters

Making your own nut butter is far more healthy than than buying the typical jar of Jif at the grocery store, and it's far more economical than buying natural nut butters at health stores, or even at the grocery store if you're lucky enough to have a grocery store that sells natural nut butters.

The Jif website tells me that their peanut butter contains roasted peanuts, sugar, molasses, fully hydrogenated vegetable oils (rapeseed and soybean), mono and diglycerides, and a metric crap-ton of salt.  Nut butters don't need any of that added stuff.  I don't even know what rapeseed oil is, and I have no idea why I'd want to consume anything that provides 150mg of sodium per serving.  The beauty of making it yourself is that you don't have to have any of that extra stuff, and if you want to sweeten it you can pick something way healthier than refined white sugar with which to do it--agave nectar, honey, maple syrup, etc.

Nut butter is fabulously healthy.  It contains fiber and essential fatty acids. It contains good quality, usable protein, without any cholesterol.  Nuts lower the risk of type II diabetes.  There are all kinds of benefits.  If you want to read further on the subject, here is a good place to start.

You can fancy up your nut butters, as well and make gourmet flavors.  Add a couple of tablespoons of cocoa powder to hazelnut butter for home made Nutella.  Add a sprinkle of cinnamon and a splash of vanilla to your almond butter.  Add a drizzle of honey to your sunflower seed butter.  Add a very ripe banana to your peanut butter.  Go where your imagination takes you.  I'm getting ahead of myself here though.  First the how to. 

All you need is a food processor and your nut of choice.  Many sites on the web will tell you that you've got to add oil to make your nut butter creamy, but this simply isn't so.  All it takes is a little bit of patience.  I made peanut butter for this how to.  I generally buy my nuts in bulk and raw.  This saves tons of money.  However, these particular peanuts came dry roasted, unsalted, and in a jar.  They were on sale for far to cheap for me to resist.  You can roast your nuts first, buy them roasted, or make raw nut butters, which are also amazing.  In fact, I prefer my almond butter to be raw.

1.  Put about two cups of your nut of choice in the food processor.  I've used peanuts, sunflower seeds, pecans, almonds, and cashews, and they've all resulted in fabulous nut butters.  My absolute favorite is the sunflower seed.

2.  Turn the food processor on high, and cover your ears, because the beginning of this process is really loud.  The nuts will break down into a flour like consistency.


2.  Turn off the food processor and scrape down the sides.  Depending on the motor strength of your processor, you may want to rest it.  This is where the patience thing comes in.  You don't need to add any oil at all.  You just need to processes and rest, process and rest until the nuts begin to release their own natural oils.  This could take anywhere from a few minutes to 20 of them, depending on the strength of your food processor.

3.  The level of creaminess is personal preference.  The picture below is still a bit too grainy for my tastes.  I like my nut butters to be very smooth.  I also like to process them until they are pretty thin.  In this case, that's because I'm going to use this in Sesame Peanut Noodles.  I also like to process it somewhat thin, because you've got to store it in the refrigerator.  I don't know about you guys, but I don't have the patience to bring something to room temperature before I spread it, so I want it to come out of the fridge already spreadable.

This is still too thick and grainy for me, so I'm going to give it a few more minutes in the food processor.

4.  Once you've reached your desired smoothness and consistency, store in an airtight container in the refrigerator.  It lasts for a couple of weeks, at least.

Now it's getting there.

Perfect!


Enjoy!

Wednesday, May 12, 2010

Easy Cheddar Biscuits

I've never much liked traditional biscuits.  They are too heavy and too dense and too salty for my tastes.  I think it's all that shortening.  I've rather got a thing against shortening anyway, even when it's vegetable shortening.  Let's just call it an irrational prejudice and move on.

The only biscuits that I ever even remotely liked were the garlic cheese biscuits at Red Lobster.  They were lighter, and they did have the whole garlic thing going for them!  Needless to say, I don't eat there anymore, so it's been a long time since I've consumed a biscuit.

These are different.  They don't have any shortening or butter.  They are way less salty than your traditional biscuit, and they aren't nearly as dense, because they don't have to be rolled out and cut into shapes.  This is a simple drop biscuit with a surprise ingredient.

Easy Cheddar Biscuits

Ingredients:

  • 1 cup unbleached all purpose flour
  • 1 1/2 tsp baking powder
  • 1/2 tsp salt
  • 1/2 cup shredded cheddar cheese
  • 1/2 cup milk of choice
  • 2 TBSP mayo  (I used light Miracle Whip, because that's what we had.  I don't eat mayo, but this is what Drew keeps on hand.)
Directions:

1.  In a small mixing bowl combine flour, baking powder, salt, and cheese. 

2.  Stir in milk and mayo until just moistened.  Don't overwork!


3.  Fill five greased/sprayed muffin cups 2/3 full. 

4.  Fill empty muffin cup(s) 1/2 full with water.


5.  Bake in a 425° oven for 18-20 minutes, until golden.


Enjoy!

Tuesday, May 4, 2010

Banana Nut Bread Oatmeal Cookies

I thought about calling these "Super Healthy, Low Fat, Banana Nut Oatmeal, Stuffed Full of Omega 3s Cookies", but that's kinda long.  People would get tired of reading the title before they got to the super easy cookie recipe.  However, it's also all true.  The only added fat is from the nuts and the flax seeds, and that's the super healthy, full of essential Omega 3s kind of fat.  It's very important that you eat these cookies, actually, because you need those Omega 3s, and your body doesn't make them.  Cookies to the rescue!

Omega-3 fatty acids are considered essential fatty acids: They are necessary for human health but the body can' t make them; you have to get them through food.  Also known as polyunsaturated fatty acids (PUFAs), Omega 3 fatty acids play a crucial role in brain function as well as normal growth and development. They have also become popular because they may reduce the risk of heart disease.

Research shows that omega-3 fatty acids reduce inflammation and may help lower risk of chronic diseases such as heart disease, cancer, and arthritis. Omega-3 fatty acids are highly concentrated in the brain and appear to be important for cognitive (brain memory and performance) and behavioral function. In fact, infants who do not get enough omega-3 fatty acids from their mothers during pregnancy are at risk for developing vision and nerve problems. Symptoms of omega-3 fatty acid deficiency include fatigue, poor memory, dry skin, heart problems, mood swings or depression, and poor circulation.
Alright.  That's enough lecturing on why you should eat these cookies.  I also made mine sugar free.  The kiddo doesn't react well when sugar is involved (in fact, his father once termed his behavior on sugar as that of "a spastic robot on speed"), and it's not good for you anyway, so I do my best to limit sugar consumption in this house.  I used a sugar free maple syrup.  Let's not have the artificial sweetener debate right now, okay?  I use the only one deemed pregnancy safe by the FDA and my doctor (who has 12 letters behind his name), so I feel safe enough.  If you don't want to use a sugar free version, then feel free to use pure maple syrup.

Banana Nut Bread Oatmeal Cookies

Ingredients:
  • 2 tsp flax seeds, ground
  • 2 TBSP cold water
  • 1 cup old fashioned rolled oats
  • 1/2 cup whole wheat flour
  • 3/4 cup old fashioned rolled oats, ground into flour
  • 1/2 tsp baking soda
  • 1/2 tsp baking powder
  • 1/2 tsp salt
  • 1/4 cup walnuts, chopped or crushed
  • 1/2 cup maple syrup
  • 1 tsp vanilla
  • 1 large banana, mashed
  • 1 heaping TBSP plain fat free soy yogurt
Directions:

1.  Preheat oven to 375°.

2.  Grind 3/4 cups oats into flour using a food processor or blender.

It should look like this when you're finished.

3.  Mix ground flax (I grind mine in the Tribest Personal Blender with the grinder blade; you can use a coffee grinder, as well) with 2 TBSP cold water and set aside to thicken.

4.  Mix oats, oat flour, wheat flour, baking soda, baking powder, salt, cinnamon, and walnuts in a large mixing bowl.


5.  To the flax mixture add syrup, vanilla, mashed banana (I just squish it around in the peel until it's mushy, and then drop it into the bowl), and soy yogurt, using a whisk to combine well.

6.  Pour wet mixture into dry mixture.


7.  Stir very well, until you've got a really thick batter.


8.  Drop by heaping TBSP onto a baking sheet that has been lined with lightly sprayed parchment paper.

9.  Flatten and smooth the tops with the back of the measuring spoon.


10.  Bake 10 minutes, or until the cookies are just slightly brown.


Enjoy!

Better Than Oatmeal?

Impossible you say?  That's what I said too, until I tried this oat, rye, barley, and wheat mixture. I bought it on a whim at Trader Joe's.  I went in for THREE items, and I came out with two bags stuffed full, and $54.00 poorer.  Somehow that always happens to me in Trader Joe's.  But I digress...  This bowl of hot grain goodness was creamy and chewy all at once.  It was just slightly sweet, and so amazing.
  • 1/2 cup organic multi-grain cereal
  • 1/4 cup coconut milk
  • 1/4 cup plain Greek yogurt
  • 1 cup water
  • 1 large banana
  • Extra dollop Greek yogurt for topping
  • Few chocolate peanut butter chips
Directions:
  1. Place multi-grain cereal, coconut milk, and Greek yogurt into container with lid.
  2. Stir well, cover, and refrigerate overnight.
  3. Next morning, slice banana into medium sauce pan and cook over medium heat until it begins to melt and caramelize.
  4. Add soaked grains and 1 cup water to sauce pan, and cook until boiling.
  5. Reduce heat to a simmer and cook for three to five minutes more, until desired creaminess is achieved.
  6. Let cereal sit in bowl for a minute before serving.
  7. Top with a dollop of Greek yogurt and a few chocolate peanut butter chips.

 Enjoy!

Friday, April 30, 2010

What IF?

It's been an exceptionally busy week, so that's why you haven't seen very many blog posts from me.  Next week will be better, and I'll be back in the kitchen.  I apologize.  Sometimes life just happens.

I'm going to do something now that I promise I won't do very often; I'm going to post an entry that's not a food or healthy living entry, but this is important to me, and I'll advocate for this particular issue with my dying breath.   I briefly mentioned in my long "my story" post that I'm an IVF patient.  This week is National Infertility Awareness Week.  In order to spread awareness, and to give voice, Keiko Zoll made this amazing, wonderful, touching, and very very brave video.  I'm reposting it here.  It deserves to be seen by as many people as possible, and I am deeply grateful that she put her heart out there for the world to see.


What IF? A Portrait of Infertility from Keiko Zoll on Vimeo.

I now return you to your regularly scheduled food blog posts. 
Thanks for taking the time to watch this video.

Tuesday, April 27, 2010

Healthy, Gluten Free Crackers

These crackers aren't so much a cracker in the thin, crispy sense.  They are thicker, chewier, heartier, with a slight crisp around the edges, and they are oh so good.  They're kind of a crackery/bready/cakey texture.  They're wonderful for the spreading of hummus or baba ghanouj.  They're fantastic as a side for soup.  Rolled thicker and cut larger, they make a good flat bread for sandwiches.  They're also pretty darned good just by themselves.  Not that I know this from experience, because I ate half a dozen of them all by myself or anything.

This recipe is a mash up of the (never home)maker's version and the Oh She Glows version, spiced to match my preferences.  Both of those blogs are amazing, and if you don't follow them, you probably should!  I've learned so much from them both.  Anyway, these crackers are also gluten free and vegan.  Win all the way around here!

This recipe offers one last advantage.  It's a way to use up leftovers.  There tends to be both left over quinoa and left over rice pretty often around here.  Unfortunately, today I had neither, so I actually had to cook!

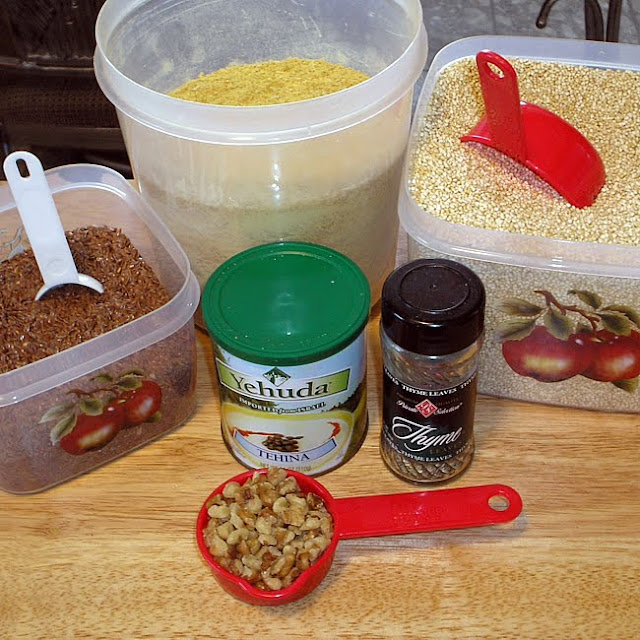
Healthy, Gluten Free Crackers

Ingredients:

  • 1 cup brown rice, uncooked
  • 1/2 cup quinoa, uncooked
  • 1/4 cup ground flax
  • 1 TBSP water
  • 2 TBSP nutritional yeast
  • 1 TBSP thyme
  • 1 TBSP oregano
  • 1/4 cup walnuts, chopped
  • 1 tsp tahini
  • 1 tsp sea salt
  • 1 tsp garlic, finely minced

Directions:

1.  Cook rice and quinoa in separate pots.

2.  Cool completely.

Because I was very anxious to make these, I just dumped them both into the bowl of the food processor and shoved it in the freezer for about 15 minutes.

3.  Preheat oven to 350°.

4.  Put all ingredients into bowl of food processor and process until well mixed.

Don't worry when it's not dough-like.  It should look like this.

5.  Dump mixture onto a greased cookie sheet.

6.  Flatten and shape the dough with wet hands.


7.  Cover with plastic wrap and roll with rolling pin to help even out the thickness and smooth the tops.  Don't worry about trying to roll it thin.  These AREN'T supposed to be thin little crackers. However, if you want to work on rolling them thin, they will bake up crispier.


8.  Use a pizza cutter to slice into desired shapes.


9.  Bake 15 minutes, and then carefully flip the crackers over.

10.  Bake 15 to 25 minutes more, until golden.  Watch very carefully after 30 minutes so they won't burn.

11.  Cool for 15 minutes on the baking sheet.  They will further firm up while cooling.


Enjoy!
Related Posts Plugin for WordPress, Blogger...