Saturday, April 10, 2010

Tofu Breakfast Sandwich

It's like an Egg McMuffin except with no egg.  And no meat.  And no cholesterol!  This is totally my kind of meal right here, though I prefer to have it for lunch instead of breakfast.  I tend to stick to smoothies and oatmeal for breakfast. 

I've been craving this for a few days, but it takes some planning, and I'm still feeling rather scattered after our whirlwind weekend in New York.  While it's very easy to make, you've got to time it right, because the tofu needs to be frozen/thawed/drained, and then it needs to marinate for about eight hours or so.  I suppose you could skip the freezing/thawing step, but I prefer not to.  It gives the tofu a firmer, more toothsome texture.

Do I even need to say that if the tofu doesn't say "non-GMO" on the package, you shouldn't buy it?

This makes enough for two sandwiches.

Tofu (for) Breakfast Sandwich

Ingredients:


for marinade:
  • 3 tablespoons apple cider vinegar
  • 1 tablespoon Dijon mustard
  • 2 tablespoons cold water
  • 6 tablespoons nutritional yeast
  • 1 tablespoon turmeric
  • 1 teaspoon garlic powder
  • 1/4 teaspoon onion powder
  • Salt and pepper to taste
for sandwich
  • 4 rectangle slices from block of extra firm tofu, frozen/thawed/drained
  • Breakfast bread of choice (bagel, English muffin, biscuit)
  • Extras of choice (breakfast "meats"--this would be a good place to try out the tempeh bacon, tomato slices, avocado slices, mushrooms, cheese, etc.)
Directions:

1.  Mix marinade  ingredients in a small plastic container with a lid.  The consistency should be a pasty liquid.

2.  Add tofu to container, close lid, and shake gently to cover.  Make sure tofu is covered completely, top and bottom.


3.  Refrigerate at least 8 hours.

next morning

1.  Spray non-stick skillet with olive oil and heat over medium heat.

2.  When oil is hot, place tofu in pan along with any non-absorbed marinade.


3.  Fry the first side four to five minutes.

4.  Prepare your breakfast bread in the toaster or toaster oven.

5.  Flip tofu and fry four to five minutes more.  It'd done when both sides are a light golden color.


6.  Remove bread from toaster and add fried tofu and any extras you desire.

I had mine on a whole grain English muffin with provolone, "bacon", and spinach.


Enjoy!

Friday, April 9, 2010

Sprout Salad

Lunch time the day before grocery day can be a depressing prospect.  I looked around my kitchen and found 1/4 of a loaf of bread, half a tomato, a few spoonfuls of left over couscous, a bit of red cabbage, and some Grape Nuts cereal.  I was at a loss as to how to make lunch happen from those scant ingredients.  Luckily, thanks to my never ending sprout project, I actually managed to make a healthy and filling lunch from almost nothing.  I had two jars of a mixture of quinoa, red lentils, brown lentils, and mung beans sprouting.  Fortunately, they were done just in time.  The best part is that I used up everything left over instead of letting it go to waste.  You all know how I feel about wasting food!

Improvised Sprout Salad

Ingredients:
  • Handful coarsely chopped red cabbage
  • 1/4 cup cold Israeli couscous
  • 1/2 cup sprouts
  • 1/2 tomato, chopped
  • Olive oil
  • Balsamic vinegar
  • Salt and pepper
Directions:
  1. Place everything but oil and vinegar into salad bowl.
  2. Lightly mist with olive oil.
  3. Add a few shakes of balsamic vinegar.
  4. Top with salt and pepper to taste.
  5. Stir it all up and eat!

Enjoy!

Wednesday, April 7, 2010

Italian Marinara Seitan on Herbed Ciabatta Rolls

Drew requested that I attempt to make my seitan "lunch meat" in an Italian flavor so that could have a sandwich like the Italian Meatball Sub from Subway.  I'm pretty proud of this actually, because this is only the second recipe I've ever made up completely by myself.  I didn't even wait for it to cool off when it came out of the oven before I tasted it, and I immediately had to text him "I made up something, and it's GOOD!"  I was so excited.  I have a few tweaks already in mind, but for now, this turned out fantastic, so here it is.

Italian Marinara Seitan Lunch "Meat"

Ingredients:
  • 1 1/2 cups vital wheat gluten
  • 1/4 cup nutritional yeast
  • 1 tsp salt
  • 1 tsp cracked black pepper
  • 1 tsp garlic powder
  • Italian seasoning, to taste.  I used 2 TBSP.
  • 1/3 cup marinara sauce + enough cold water to make 3/4 cup
  • 4 tsp tomato paste
  • 2 tsp olive oil
  • 1 TBSP soy sauce
  • 2 TBSP cold water
Directions:

1.  Preheat oven to 325°

2.  Mix dry ingredients in a large bowl.  Mix them VERY WELL.

3.  In a liquid measure, measure out 1/3 cup marinara sauce and then add enough cold water to make 3/4 cups.  Mix well.

Apropos nothing, this measuring cup belonged to my grandmother, and I'm inordinately attached to it.  She died when I was 15, and to this day, she remains just about my favorite person ever.  I'm pretty sure that I wouldn't be able to cook without this particular cup!

4.  Place marinara/water mixture into small bowl, and add the rest of the liquid ingredients. Whisk well.

5.  Add wet ingredients to dry ingredients, and mix with hands.


6.  Knead until fully incorporated.  There will be a point where it looks like it's not going to mix.  Keep kneading.  It will mix.

 When you're finished kneading, you will have a very unappetizing looking lump.  Don't worry; it's supposed to look this way.

7.  Roll into a log shape and wrap in two layers of foil, making sure the seam is in a different place both times.

Don't worry about trying to smooth it out and make it even.  It will plump and snap into shape in the oven.  All you need to do is make it vaguely log shaped, and you're good to go.

8.  Twist ends tightly to seal.  It should like like a giant Tootsie Roll.


9.  Bake 90 minutes, rolling log over halfway through.

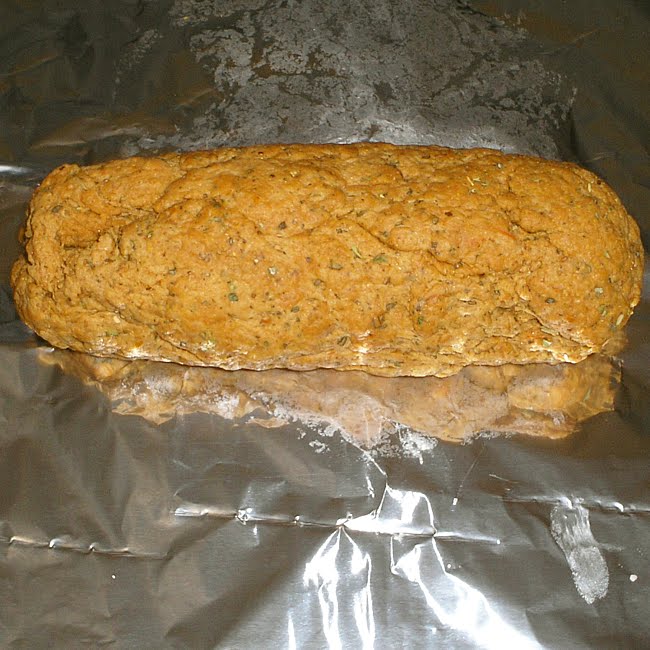
Though it looks like it, it's not burned on one end.  That's my shadow, because I was ditsy enough to stand in the light while taking the picture.  See how nicely it snapped into shape?  Drew likes this, because it's got the texture of Summer Sausage.  He's all about the texture; there are things that he actually thinks taste good but he can't eat because the texture isn't right.  Woohoo WIN!

Herbed Ciabatta Rolls

Ingredients:
  • 1 1/2 cups unbleached white flour
  • 1 cup whole wheat flour
  • 2 TBSP vital wheat gluten
  • 2 1/4 tsp instant dry yeast
  • 2 TBSP sugar
  • 1 tsp salt
  • 1 scant TBSP dried Italian seasoning (or use 1/2 cup fresh herbs)
  • 1 cup hot water
  • 2 TBSP olive oil
Directions:

1.  In food processor, mix flours, vital wheat gluten, salt, sugar, herbs (either dried or fresh), and yeast.


2.  Transfer dry ingredients to large mixing bowl.

3.  Turn on faucet until water runs as hot as it will get.  Measure 1 cup water and add to dry ingredients.

4.  Knead until blended.

5.  Add olive oil and knead for another three to five minutes until well incorporated.  Yes, the dough is supposed to be very soft and very sticky at this point.

6.  Place dough in a greased bowl, coating all sides.  Cover with plastic wrap and let rise somewhere warm for 20 minutes, until dough has doubled in size.

7.  Punch dough down.

8.  On a well floured surface, portion dough and form into round or oval shapes.  How many you make depends on what you're making.  You should get about 12 dinner sized rolls or 6 sandwich sized rolls.

9. Coat dough with flour and place on a greased cookie sheet.

I made sandwich rolls.  Ciabatta is the perfect bread for something you want to eat with lots of sauce, because it's dry, and all of the nooks and crannies hold the sauce well.  They plumped up to about twice this size after the final rise.

10.  Cover all rolls with plastic wrap and let rise in a warm place until doubled in size, about 40 minutes or so.

11.  Bake for 25 to 30 minutes in 350° oven, until bottoms of rolls are golden and tops are soft.


I mixed up the seitan first and started it baking, and then I started on the rolls.  The timing came out almost perfect, and the rolls were ready to go in when the seitan came out.

Slice the seitan into coins, slice open a roll, add as much lunch meat as you wish, top with soy cheese of choice (or actual cheese if you eat dairy), and add some more marinara sauce.  Pop the whole thing in the microwave for 30 - 40 seconds, and you've got yourself a completely vegan Italian sub!


Enjoy!

Tuesday, April 6, 2010

Scrambled Tofu with Grilled Vegetables

The kiddo has baseball practice tonight, so that means we'll be eating a late and light dinner.  I decided that a filling and hearty lunch was in order.  I've been cooking all day, so I also wanted something quick and easy.  This meal came together in mere minutes.

Scrambled Tofu

Ingredients:
  • 1/2 block firm tofu, frozen/thawed/drained 
  • 1 tablespoon nutritional yeast
  • 1/4 teaspoon turmeric
  • 1/4 teaspoon onion powder
  • 1/4 teaspoon garlic powder
  • 1 tablespoon soy sauce
  • pepper to taste

Directions:

1.  Crumble tofu into small mixing bowl.
2.  Add all other ingredients and mix well with fork, making sure tofu is evenly coated.

3.  In an oiled skillet cook the tofu for eight to ten minutes over high heat.  It's done when the tofu begins to brown around the edges.
 
 
Because I live in Chicago and went from three feet of snow to never ending thunderstorms in the course of a week, I had to grill my vegetables inside.  I used the George Foreman Grill.  This is a fantastic invention and not just for meat eaters!
 
 
Anyway, cut your vegetables into uniform thickness.  I used zucchini, eggplant, tomatoes, and onions.  Spray George with some olive oil, lay out your veggies, mist the tops of the veggies with more olive oil, salt and pepper to taste, and then cook 'til grilled through.  Mine took about five minutes.
 
See, aren't they lovely?

 
Enjoy!

Monday, April 5, 2010

Pinch Your Pennies - Breakfast Convenience Foods

Greetings!  I'm back after a long and sunny weekend in New York.  There are no recipes today, because I'm in the midst of unpacking, laundry, checkbook balancing, and getting myself organized again.  You know, the normal post travel agenda. 

I do have a penny pinching post, though!  If there's one thing I go out of my way to do, it's save money wherever I can.  Too much goes to waste in this world.  Anyway, I'll be the first to admit that breakfast convenience foods are ... well, convenient.  However, they are generally neither healthy nor are they inexpensive.  For example, at my local grocery, a box of French Toast Sticks costs $6.99, making them $1.09 per serving.  One serving of five pieces, has 330 calories.  I make my own French Toast for a fraction of the cost and about a bazillion times the health.  Mine ends up having 76.5 calories for the same serving size, and the total cost per serving averages out to be 15¢.  That's a savings of 253.5 calories and 94¢ per serving!  That's a big deal, you guys.

You can do this with pancakes and waffles, as well.  Not only are you saving a lot of money, you get to decide what goes into your food.  You can make it completely vegan, low fat, sugar free, organic, etc. etc.  It's all up to you.  You get to decide what kind of bread to use in your French toast, or even make your own bread.  You get to decide what types of flours go into your waffles or pancakes.  Find a hour or so of free time, make up a big batch, freeze it, and then pop the (French toast, waffles, pancakes) into the toaster (just like the expensive, caloric, chemical filled grocery store kind!) for a fast and convenient breakfast.

I recently made two loaves of French Toast.  The total cost for both loaves was $5.68.  That's 40 servings of French Toast sticks for $1.31 less than six and a half servings of the store bought variety.  Mine was sugar free, salt free, and of course chemical and preservative free.  It was not vegan, but the point is that it could have been.  This is what you make it.

I mixed up a big bowl of Egg Beaters, soy milk, cinnamon, cloves, and nutmeg, and I used whole wheat bread.  I staged everything so I'd be ready to go.  I made mine on a griddle, but you can just as easily use a nice skillet.


Next I dipped the bread into the egg mixture and cooked it in batches on the griddle.


No matter what it is that you're making, be sure to cool it COMPLETELY before freezing.  I do this by laying the pieces out on a clean, dry dish cloth.


When it is completely cool, then you can freeze it.  I just put my French toast pieces back into the original bag that the bread came in.  You can store it in Ziploc bags.  You can put it in freezer safe containers.  You can wrap it in waxed paper and tinfoil.

When it's time for breakfast, just pop a couple of pieces into the toaster, and you're all set to enjoy a quick, convenient, low cost, and healthy breakfast!
Related Posts Plugin for WordPress, Blogger...