It's been an exceptionally busy week, so that's why you haven't seen very many blog posts from me. Next week will be better, and I'll be back in the kitchen. I apologize. Sometimes life just happens.
I'm going to do something now that I promise I won't do very often; I'm going to post an entry that's not a food or healthy living entry, but this is important to me, and I'll advocate for this particular issue with my dying breath. I briefly mentioned in my long "my story" post that I'm an IVF patient. This week is National Infertility Awareness Week. In order to spread awareness, and to give voice, Keiko Zoll made this amazing, wonderful, touching, and very very brave video. I'm reposting it here. It deserves to be seen by as many people as possible, and I am deeply grateful that she put her heart out there for the world to see.
What IF? A Portrait of Infertility from Keiko Zoll on Vimeo.
I now return you to your regularly scheduled food blog posts.
Thanks for taking the time to watch this video.
Friday, April 30, 2010
Tuesday, April 27, 2010
Healthy, Gluten Free Crackers
These crackers aren't so much a cracker in the thin, crispy sense. They are thicker, chewier, heartier, with a slight crisp around the edges, and they are oh so good. They're kind of a crackery/bready/cakey texture. They're wonderful for the spreading of hummus or baba ghanouj. They're fantastic as a side for soup. Rolled thicker and cut larger, they make a good flat bread for sandwiches. They're also pretty darned good just by themselves. Not that I know this from experience, because I ate half a dozen of them all by myself or anything.
This recipe is a mash up of the (never home)maker's version and the Oh She Glows version, spiced to match my preferences. Both of those blogs are amazing, and if you don't follow them, you probably should! I've learned so much from them both. Anyway, these crackers are also gluten free and vegan. Win all the way around here!
This recipe offers one last advantage. It's a way to use up leftovers. There tends to be both left over quinoa and left over rice pretty often around here. Unfortunately, today I had neither, so I actually had to cook!
Healthy, Gluten Free Crackers
Ingredients:
Directions:
1. Cook rice and quinoa in separate pots.
2. Cool completely.

3. Preheat oven to 350°.
4. Put all ingredients into bowl of food processor and process until well mixed.

5. Dump mixture onto a greased cookie sheet.
6. Flatten and shape the dough with wet hands.

7. Cover with plastic wrap and roll with rolling pin to help even out the thickness and smooth the tops. Don't worry about trying to roll it thin. These AREN'T supposed to be thin little crackers. However, if you want to work on rolling them thin, they will bake up crispier.

8. Use a pizza cutter to slice into desired shapes.

9. Bake 15 minutes, and then carefully flip the crackers over.
10. Bake 15 to 25 minutes more, until golden. Watch very carefully after 30 minutes so they won't burn.
11. Cool for 15 minutes on the baking sheet. They will further firm up while cooling.

Enjoy!
This recipe is a mash up of the (never home)maker's version and the Oh She Glows version, spiced to match my preferences. Both of those blogs are amazing, and if you don't follow them, you probably should! I've learned so much from them both. Anyway, these crackers are also gluten free and vegan. Win all the way around here!
This recipe offers one last advantage. It's a way to use up leftovers. There tends to be both left over quinoa and left over rice pretty often around here. Unfortunately, today I had neither, so I actually had to cook!
Healthy, Gluten Free Crackers
Ingredients:

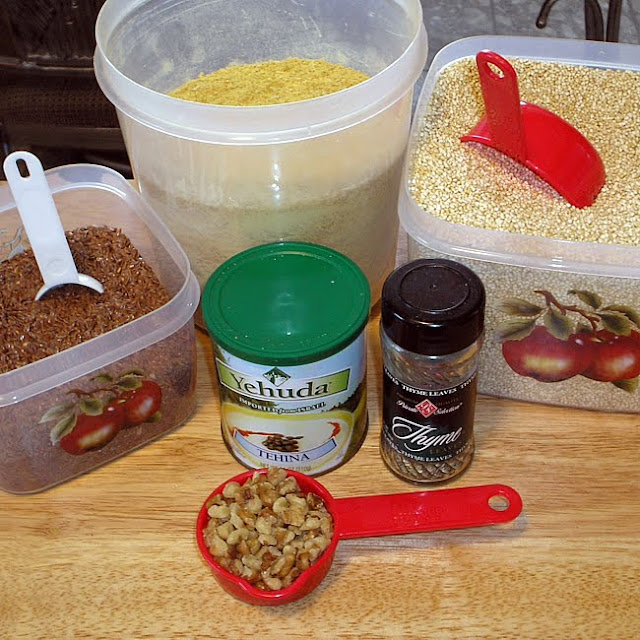
- 1 cup brown rice, uncooked
- 1/2 cup quinoa, uncooked
- 1/4 cup ground flax
- 1 TBSP water
- 2 TBSP nutritional yeast
- 1 TBSP thyme
- 1 TBSP oregano
- 1/4 cup walnuts, chopped
- 1 tsp tahini
- 1 tsp sea salt
- 1 tsp garlic, finely minced
Directions:
1. Cook rice and quinoa in separate pots.
2. Cool completely.

Because I was very anxious to make these, I just dumped them both into the bowl of the food processor and shoved it in the freezer for about 15 minutes.
3. Preheat oven to 350°.
4. Put all ingredients into bowl of food processor and process until well mixed.

Don't worry when it's not dough-like. It should look like this.
5. Dump mixture onto a greased cookie sheet.
6. Flatten and shape the dough with wet hands.

7. Cover with plastic wrap and roll with rolling pin to help even out the thickness and smooth the tops. Don't worry about trying to roll it thin. These AREN'T supposed to be thin little crackers. However, if you want to work on rolling them thin, they will bake up crispier.

8. Use a pizza cutter to slice into desired shapes.

9. Bake 15 minutes, and then carefully flip the crackers over.
10. Bake 15 to 25 minutes more, until golden. Watch very carefully after 30 minutes so they won't burn.
11. Cool for 15 minutes on the baking sheet. They will further firm up while cooling.

Enjoy!
Monday, April 26, 2010
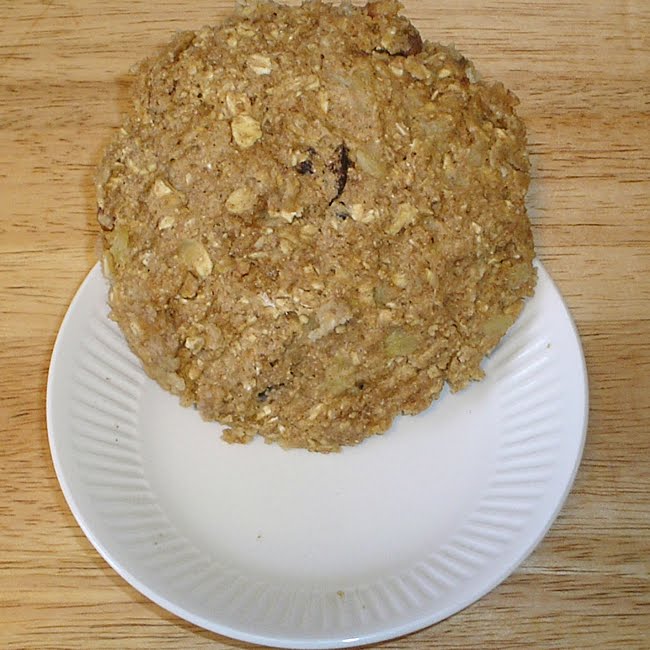
Handheld Oatmeal to Go!
Yes really. This is like the most brilliant thing ever! I got the original idea from here, and then I changed a few little things tweaked the hell out of the recipe. I've got no clue why I've never thought of this, but now that it's on my radar, there's just no looking back. I have already thought of about four dozen different variations of this recipe that I want to try.
There are days when, despite my best intentions, I just don't make it out of bed in time in order to accomplish everything I need to before I have to be somewhere. This recipe is perfect for those types of days. In just a few short minutes I can turn my beloved bowl of oatmeal into a big ol' oatmeal "cookie" and take it with me. Cookies. For breakfast. It just doesn't get much better than that!
Handheld Oatmeal to Go
Ingredients:
1. Put everything in a bowl and mix it up really well with a fork, mashing the banana pieces into the batter as you go.

2. Pat firmly into bowl with the back of a spoon.
3. Microwave on high for two minutes.
4. Let cool for about a minute before removing from bowl.


Enjoy!
There are days when, despite my best intentions, I just don't make it out of bed in time in order to accomplish everything I need to before I have to be somewhere. This recipe is perfect for those types of days. In just a few short minutes I can turn my beloved bowl of oatmeal into a big ol' oatmeal "cookie" and take it with me. Cookies. For breakfast. It just doesn't get much better than that!
Handheld Oatmeal to Go
Ingredients:
- 1/4 cup rolled oats
- 1/8 cup Egg Beaters
- Liberal dash of cinnamon
- 1/4 tsp baking powder
- Splash vanilla
- 1 TBSP dried cranberries or blueberries
- 1 TBSP chopped walnuts
- 1 TBSP natural peanut butter
- 1/2 small banana, sliced thin
- 1 TBSP raw sugar
- 2 TBSP whole wheat flour
1. Put everything in a bowl and mix it up really well with a fork, mashing the banana pieces into the batter as you go.

2. Pat firmly into bowl with the back of a spoon.
3. Microwave on high for two minutes.
4. Let cool for about a minute before removing from bowl.

Enjoy!
Friday, April 23, 2010
Potato Pancakes
Sometimes having leftovers is a good thing. I am ever mindful of waste, so I try not to have very many, but sometimes it happens, and I have to find a way to use them, because we just don't waste food in this house. Sometimes it's rather challenging to figure out how to use them up, and sometimes it's really easy. This was one of those easy times.
Leftover Potato Pancakes:
Ingredients:


Enjoy!
Leftover Potato Pancakes:
Ingredients:

- 1 cup cold mashed potatoes
- 1 TBSP ground flax seeds + 3 TBSP cold water (or one egg if you aren't vegan)
- 1 TBSP soy milk
- 2 TBSP flour (I used whole wheat)
- Seasonings to taste (Since my potatoes were already roasted garlic mashed potatoes, I used Italian seasoning and onion powder. Cajun is good. Garlic and onions powders are good. Just use what you like.)
- Grind flax seeds in coffee grinder or capable blender and mix with 3 TBSP cold water. Set aside for ten minutes to thicken.
- Mix everything else together well, add flax mixture when thick, and mix again.
- Form into three pancakes.
- Spray non-stick skillet with olive oil or cooking spray.
- Lay pancakes in skillet in a single layer and cook until each side achieves desired done-ness. I like mine to be really crispy on the outside and creamy on the inside.

Today's lunch: zucchini and tomato slices with a potato pancake and a roll left over from last night's dinner.
Enjoy!
The Best Bowl of Oatmeal Ever!
Alright so this bowl of oatmeal was a complete accident. It's something of a mash-up of Kath's overnight oats and my own tropical oatmeal, though with fresh fruit instead of dried. I was making regular overnight oats, except I used coconut milk instead of soy milk. I figured I'd have a coconutty tropical bowl this morning and just eat a banana on the side.
Two things happened. First of all, I used steel cut oats. I love them! They are way better than rolled oats--firmer, chewier, heartier. That's the problem here. They don't really make good overnight oats. They don't completely absorb the liquid and get all soft like rolled oats do. The second thing that happened was that it's cold. Yes, I know it's almost May. Don't tell me; tell Mother Nature.
Since my oats had been soaking in coconut milk and yogurt all night, I thought about scrapping them and just starting over. I had no idea how cooking them would go with all that yogurt. I am loathe to waste food, however, so I decided to give cooking them a shot. What's the worst thing that could happen, right? What resulted was the best bowl of oatmeal I've ever had!
Ingredients:

Enjoy!
Two things happened. First of all, I used steel cut oats. I love them! They are way better than rolled oats--firmer, chewier, heartier. That's the problem here. They don't really make good overnight oats. They don't completely absorb the liquid and get all soft like rolled oats do. The second thing that happened was that it's cold. Yes, I know it's almost May. Don't tell me; tell Mother Nature.
Since my oats had been soaking in coconut milk and yogurt all night, I thought about scrapping them and just starting over. I had no idea how cooking them would go with all that yogurt. I am loathe to waste food, however, so I decided to give cooking them a shot. What's the worst thing that could happen, right? What resulted was the best bowl of oatmeal I've ever had!
Ingredients:
- 1/4 cup steel cut oats
- 1/4 cup coconut milk
- 1/4 cup plain soy yogurt
- Liberal amount of cinnamon
- Dash of allspice
- 1 cup water
- 1/2 banana
- 1/2 mango
- Place oats, coconut milk, yogurt, cinnamon, and allspice in a container with a lid.
- Stir well and allow to soak overnight in the refrigerator.
- The next morning, cut up half of a banana and half of a mango into chunks.
- Place fruit in medium sized sauce pan, and cook it over medium heat. The fruit will start to get soft, melty, and caramelized.
- Add soaked oats and one cup of water to the pan and stir well.
- Let cook until it begins to softly bubble, about three minutes.
- Once it begins to bubble, cook, stirring continuously for three to five minutes more.
- Let sit for a minute before serving.

Enjoy!
Subscribe to:
Posts (Atom)